The Glossary Manager is the tool that allows you to manage the words you want to learn.
As shown in the picture below, it is divided in three sections. A menu bar with some buttons a the top and two large panes on the left and right central area. The first pane contains a hierarchical structure (a tree) including Folders and Glossaries. The second pane displays either a folder or glossary's details.
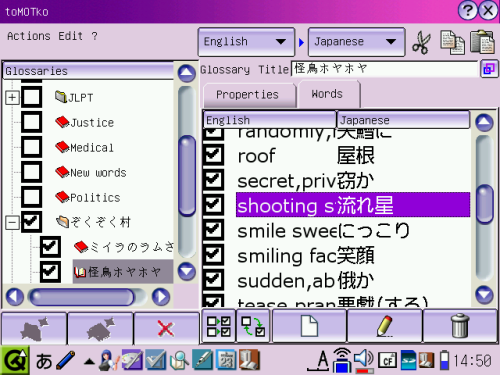
The first pane allows you to organize your glossaries in a way very similar to how files are organized on your computer.
You can create a new folder clicking the first button, at the bottom. Once created, a folder will be added into the currently selected folder. The sub-folders are sorted alphabetically. You can rename a folder entering a new value in the title field in the second pane. You can embed folders into other folders and organize them in a way that makes sense to you.
You can create a new glossary clicking the second button, at the bottom. A glossary contains a list of words that logically belong together. For example, you could have glossary for words related to politics or another one containing animals, and so on. You can provide a title to a glossary to express its content.
You can remove a folder and all its content clicking the third button. A confirmation dialog will appear first. Once a folder is deleted, its content is lost permanently. You can remove a glossary the same way.
Please note that when a glossary is removed, images associated to terms may be deleted as well. If the images are contained inside toMOTko's internal directory, they will be deleted. This generally applies for imported glossaries. Imported images are stored into toMOTko's internal directory. This is a reasonable default behavior that allows to reclaim space from imported glossaries that you don't need anymore.
However, if the images are referenced outside toMOTko's internal directory, they will not be deleted. This generally applies for images that you associate to terms that you created yourself (unless you export and reimport back your glossary, in which case, the images will be copied to toMOTko's internal directory.) This allows you to delete glossaries written by yourself without losing your images.
The second pane is used to manage the selected item in the first pane, either a Folder or a Glossary.
For a Folder, the second pane will display its title, description, and author. You're free to enter any text in these three fields. By default, the author field will take the parent item's value automatically. For example, if you create a new folder and the parent folder's author is "John Smith", the author of the new folder will take the same value.
Other metadata are available for a folder, including its creation and modification date and a small table containing some interesting statistics like : children folder and glossary counts, whether they are checked and/or available for quiz, etc.
For a Glossary, the second pane will is organized similarly but the information is distributed into 2 subpanels.
The first subpanel displays the title, the description, and author. You're free to enter any text in these three fields. By default, the author field will take the parent item's value automatically. For example, if you create a new glossary and the parent folder's author is "John Smith", the author of the new glossary will take the same value.
Other metadata are available for a glossary, including its creation and modification date and a small table containing some interesting statistics like : number of words that it contains, that are checked and available for quiz.
The second subpanel displays the list of words the glossary contains (including its meanings/readings, if available, in the selected languages).
For better readability, you can maximize the details area by clicking the Double square button.
When a Glossary is created, it's empty. It doesn't contain any word. To add a new word, you click the third button, at the bottom of the second pane. A dialog window will appear where you will be able to input the word and its meanings. A Comment text field is also available for you to put examples or any information that is pertinent to you. You must click Ok at the top of the dialog to save the modifications. Otherwise, you can click the X to cancel the operation.
To edit a word, you select it and click the fourth button at the bottom of the second pane.
To delete a word, you select it and click the fifth button at the bottom of the second pane. A confirmation dialog will appear first. You can select more than one word for deletion. A deleted word is lost permanently and cannot be restored. If some of the selected words contain more than two translations, a dialog box will ask you to choose which translations to delete.
To illustrate all this, here is an example, you could have a Books folder containing two sub-folders for the books Shogun and Geisha. Inside each sub-folder, you could have glossaries for each chapter of each book (like 1, 2, 3, and so on) that would contain words that you want to learn.
The Glossary Manager also allows you to perform the word selection for the Quiz. To select a word you want to be asked for in the Quiz, you must check the box at the left of the chosen word. You must also check its folder and all its parent folders until you reach the root of the tree (the very first top folder). This defines a kind of path from the root of the tree to the chosen word. When you start a new Quiz, the words that will be considered will be those that are checked and reachable from such paths. This may seems complicated at first but once you understand the idea, it will allow you select or unselect groups of words very quickly.
The first button at the bottom of the second pane allows you to select all words in one click.
The second button at the bottom of the second pane allows you to reverse the selected words in one click.
Note: the root of the tree, the very first folder is always checked. It cannot be unchecked.
It's possible to learn more than one language with toMOTko. To select a learning language, you use the language selector on the top of the screen, on the menubar. You can choose your source language (usually, this will be your mother tongue but it could be another language as well) with the left language selector. You can choose the target language (that is, the language you are learning) using the right language selector.
The hierarchical tree will update its content in function of the selected languages, unless the Show all glossaries and terms is checked. In such case, all the glossaries and terms will be displayed no matter the languages selected.
The Show all glossaries and terms option is convenient in the case you would like to translate a glossary in a third or fourth language. For example, if you have a glossary of medical terms in English and Japanese, and that you would like to learn the very same words in Spanish, you could set the source language to English, the target language to Spanish and check the Show all glossaries and terms option. When this option is set, the terms of a glossary will be shown in the right pane even though they don't have translations in the selected languages. In our case, as we set the target language to Spanish, we will only see the words in English in the right pane. We can then edit each word and add the translation in Spanish. Once all (or some of) the words have been translated, the Show all glossaries and terms option is no more required to display the terms and we can turn it off.
It's also possible to import/export glossary files so you can share your words with your friends.
To import a glossary, in first place, you must get it from an external source, either via Internet (if your device is net-enabled), or file transfer (using SD card, USB cord or I/R). You can copy the glossary file in your Documents directory (/home/zaurus/Documents) or elsewhere. After that, using the Glossary Manager, you select the folder into which you want to import the glossary. Then, you select the Import... menu item in the Actions menu. A file browser dialog will appear and you will be able to select the desired glossary. When a glossary contains words in more than 2 languages, a dialog box will ask you to choose which languages you want to import. If you select a language that is not among the declared study languages (in the preferences), it will be added automatically. If you don't see the imported glossary in the tree, select "Show all glossaries and terms" in the Actions menu and it should appear or select the appropriate languages with the Language Selector to update the tree.
If any images are associated to some terms in the imported glossary, they will be copied into toMOTko's internal directory. If you ever remove the imported glossary ulteriorly, the imported images will be deleted as well to reclaim space.
Importing large glossary files can take quite a bit of time on the Zaurus so be patient and wait until the operation is completely performed. A dialog should indicate if the operation was successful or not. If the import fails, check your available space and file permissions.
To export a glossary you select either a glossary or a folder in the Glossary Manager. Then, you select the Export... menu item in the Actions menu. If you select a folder, all the containing glossaries and folders will be exported. When glossaries to export contain words in more than 2 languags, a dialog box will ask you to choose which languages you want to export. A file browser dialog will then appear so you can specify the location and the zip file that will contain the exported data. Once this is done, data should be exported. If any images are associated to some terms, they will be included as well into the zip file so that they can be imported back from someone else.
Exporting large glossary or folder containing a lot of subfolders and glossaries can necessitate a few minutes on the Zaurus, so be patient and wait until the operation is done. A dialog message should indicate if the operation was successful or not. If an export fails, check for your available space and file permissions.
The construction of website dedicated to the sharing of toMOTko glossary files is in planning. However, until the website is properly set up, if you would like to make a vocabulary file available to everybody, send it to toMOTko's author by email. Please mention your name so he can give you credit for your contribution, and also, indicate if your email can be disclosed or not, so that other users can contact you in case of corrections. You should also specify this information in the top folder (or glossary)'s description and author properties. The submitted glossary files will be made available on the toMOTko's homepage to everyone's benefit.
To duplicate or move words, glossaries or folders from one place to another, you can use the Copy, Cut and Paste buttons at the top-right corner of the screen or use the Edition menu.
In case you would like to look for a specific word, you can perform a search invoking the Search tool from the Edit menu of the Glossary Manager. This can be convenient to find duplicate words or simply to act as a rudimentary dictionary substitute.
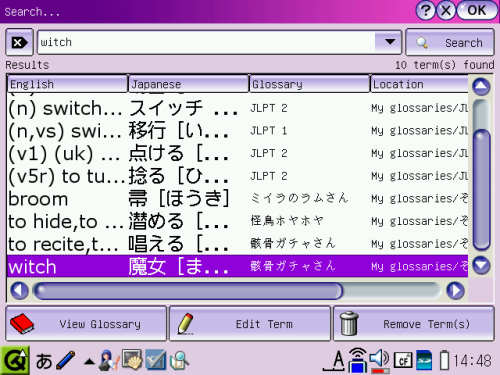
Enter the word you want to find in the query field on top of the screen and click the Search button. Number of terms found will be shown and listed below. Each entry will contain the values for the languages specified by the language selectors. The name of the glossary containing the term will also be shown and its location as well (similar to a file path). You can access the containing glossary clicking the View Glossary button. You can also directly edit a term clicking the Edit Term button. This button is also useful to browse the details of a term (for example, to see the image or comment field). It's also possible to remove terms from this list using the Remove Term(s) button.
To clear the Search form, you can click the special button left of the query field.
Previous queries are stored in the query field. You can retrieve them clicking the down arrow at the right edge of the query field.
If you change the values in the language selector, the Search form will be cleared.